Simple Upcycling Tutorial

It’s that time of year now when we all unpack our hats and scarves. But sometimes you just don’t like them as much as you did last year. Maybe you have a new coat or hairstyle, maybe you just fancy something new. Whatever the reason you shouldn’t just bin last years wares, instead you should up/recycle them into something stylish and new. Here I’m bringing you one really simple and quick way to turn a plain hat and scarf into a gorgeous new item.

What You’ll Need

Hat

Scarf

Buttons

Sewing Needle & Thread

Step 1

To be truly economical you should raid your button stash. If you don’t have any buttons then take a look through your clothes, are there any you were planning to get rid of and could borrow the buttons from? How about making your own (see my previous tutorial here for instructions) or buy some.

Personally I like the buttons to be different sizes, styles and shapes. From a design point of view odd numbers always look better so keep that in mind.

Step 2

Arrange your buttons on the hat until your pleased with the effect, then sew them on. I sewed mine slightly to one side.

Step 3

Repeat the previous step on your scarf.

Step 4

Enjoy your brand new creations!! It really is as quick, simple and cheap as that!

Reuse, Recycle and Enjoy!

I was recently given two old pieces of furniture from Ikea. The owner was going to take them to the tip but I like to try and recycle things when I can and this furniture fitted into my house just not with it’s present look. They had been unfinished bare wood treated with a clear wax, although they still felt quite rough to the touch. I would love to show you the before pics but unfortunately I didn’t remember to take any.

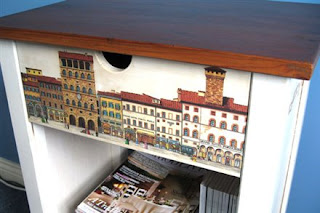
I sanded them and then finished the tops with a darker briwax. I painted the bases white with paint tester pots. Finally came the fun stage where I got to play about with designs. I have accumulated quite a lot of decorative paper when in Italy and decided to finally put it to use, it always seemed too special for wrapping presents and then being thrown away. For the first cupboard I decided to cut out really simple house shapes from a variety of Venetian papers. I arranged the pieces in a design I liked and this is the end result.

For the second cupboard I cut out street scenes from paper bought in Florence. Each side had a different scene upon it.

The pictures were stuck on with PVA glue and then varnished afterwards with a quick drying matt varnish. Once this was dry I sanded it with very fine paper. I washed off the dust and varnished again. I did this process another four times until I could hardly feel where the paper pieces were.

These are now two very useful items that cost hardly anything to refurbish, mainly some time.